Introduction
Each email is designed with a few staple elements, no matter the platform they are being designed on or the person they are being designed by. These elements are the header, the body, and the footer.
The footer is an interesting part of the email because it contains a lot of information about the brand. Apart from being informative, the footers are also the element that provides the users an opportunity to parlay their requirements via preference and subscription centers (generally these exist on the same page).
What is a Preference Center?
Preference Centers are developed by brands where they offer their subscribers a space to choose the types of communications that they would want to receive. This page can also be used by brands to collect more information about their subscribers in addition to obtaining their consent and likes and dislikes.
These pages are trendy among marketers because they can be a non-intrusive way of showing their offerings, in terms of newsletters, periodicals, or promotions, to their subscribers.
Why do we need Preference Centers?
We are aware of the existence of preference centers, but why are they there? We can certainly save all the trouble of maintaining one extra page if we can, but there are many reasons (most of them advantageous to both the subscribers and the brands) for the presence of these pages. Let’s go through these:
- Mandated by CAN SPAM and GDPR- CAN SPAM mandates that subscribers should be allowed to unsubscribe from emails not visiting more than one web page. Whereas, GDPR requires that data must be collected in a lawful, fair, and transparent manner. Additionally, it states that only adequate and required personal data should only be collected. These government guidelines direct email marketers to a page that would cater to the subscribers’ needs in collecting their personal information, consents and preferences.
- Progressive Profiling of Subscribers- As mentioned in the previous point, only relevant data needs to be obtained from the subscribers regarding their profile and their preferences. This progressive profiling of users leads to better targeting by the marketers, Information collected not only helps brands with completing their database, but also the consumers who only receive relevant emails and SMSs, resulting in less spam and unsubscribes.
- Give Control to Subscribers- A preference center gives back control to consumers regarding what data is present with the brands and for how long. Subscribers can choose to divulge the information they feel confident with and subscribe to emails they want to receive. They can also unsubscribe anytime they feel they do not have the need to receive emails/SMSs from the brand without having to write an email and wait for the brand’s team to do so manually.
- Manage Subscriptions- Preference centers are one of the most interactive (and government-compliant) ways for brands to manage subscriptions. These can be used for the minimization of unsubscribes since other options can be presented to the subscribers rather than just the global unsubscribe.
What is a custom preference center?
Salesforce Marketing Cloud comes with an out-of-the-box solution that helps brands create a standard profile, preference, and subscription center. These pages adhere to the basic requirements and are very straightforward to implement.
There exists one profile center page and a page for subscriptions and preferences. The profile center, as the name suggests, is used to collect profile-based data from the subscribers (for example Name, Last name, Age, etc.). It is also used for managing preferences (HTML, SMS, etc.). Whereas the Subscription center has the option of updating subscribed publications (publication lists in the Marketing Cloud) and the option to unsubscribe from all.
To access the profile and subscription center:
- Email Studio –> Email –> Subscribers –> Profile Management

- Click on Preview Profile Center

- Click on Preview Profile Center and select Subscription Center


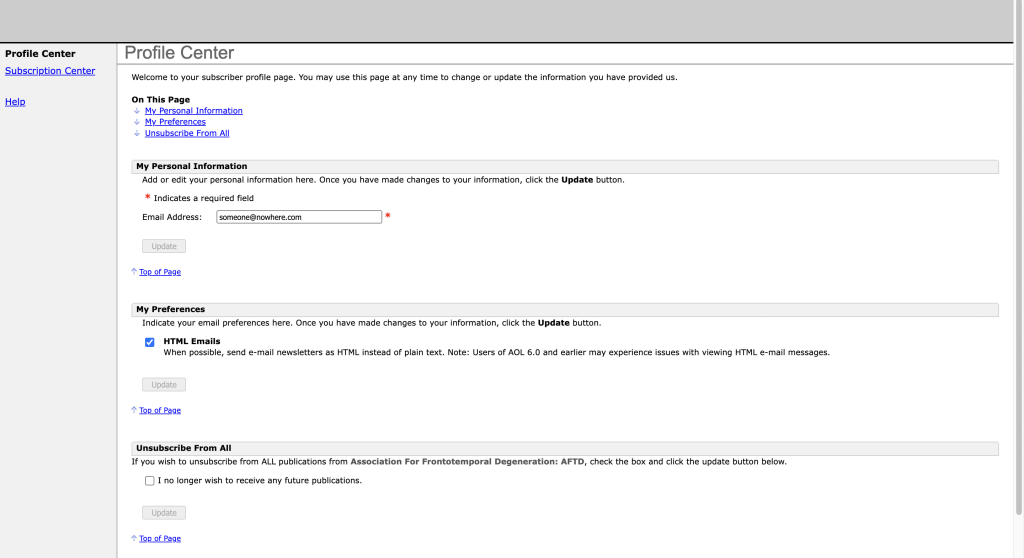

As one can see, the abilities of a standard profile and subscription center that comes with Salesforce Marketing Cloud are very limited. To overcome this, most of the companies that use marketing cloud build their custom preference centers. These pages can be customized according to the brand requirements and can be made as complicated or as simple as the data model demands. A custom preference center, in other words, is the more advanced version of the standard pages that come with Marketing Cloud.
Requirement Gathering for a Custom Preference Center
We are now aware of the theory behind custom preference centers. While working on Salesforce Marketing Cloud implementations, consultants and developers host a lot of discovery sessions around the requirements of clients. Custom preference centers are one of those solutions that need the presence of the business as well as the development team to be present while the key decisions are being made. We have a list of topics/questions that have been helpful to us during our discovery sessions that have focused on custom preference centers.
- Would the client team like the profile, preference, and subscription section to be on the web-page or separate?
- Whether the User Interface (UI) of the web-page reflect that of their business website
- Whether they would want to show different lists for the subscribers to subscribe to
- Whether they want to include the option of “snoozing” emails/SMS for a specific period of time
- Whether they want to give their customers the option to decide the frequency of newsletters/emails
- The option to update both marketing cloud and sales cloud (other CRM) from the page
- The objects in Salescloud that need to be updated from the page (Contacts, Leads, Accounts or all of them)
- Whether they would like to send a triggered “Thank You” email to the subscribers when they submit any new information or edit their subscription/preferences
How to Build a Custom Preference Center
To build a custom preference center, we need to build an HTML form with AMPScript added to it. The HTML /CSS form will take care of the UI whereas the data will be fetched and updated by AMPScript.
The steps to building the page can be broken down into 3 major stages:
Stage 1: Create Data Extensions
Stage 2: Create the landing page with the HTML/CSS form
Stage 3: Add the AMPScript
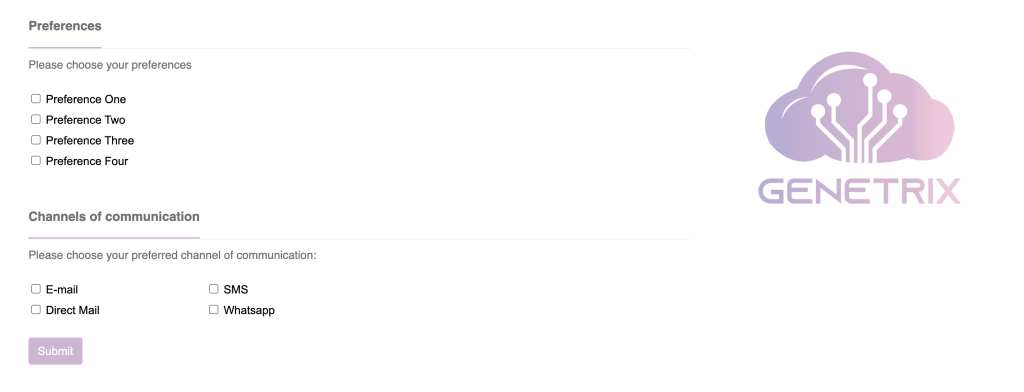
We will now go through each stage in detail. By the end of these steps, we should have a functioning custom preference center page. We are building a basic subscription and preference center. We will only be asking our subscribers for the preferences of issues they would like information on and their preferred channels of communication.
Stage 1: Create Data Extensions
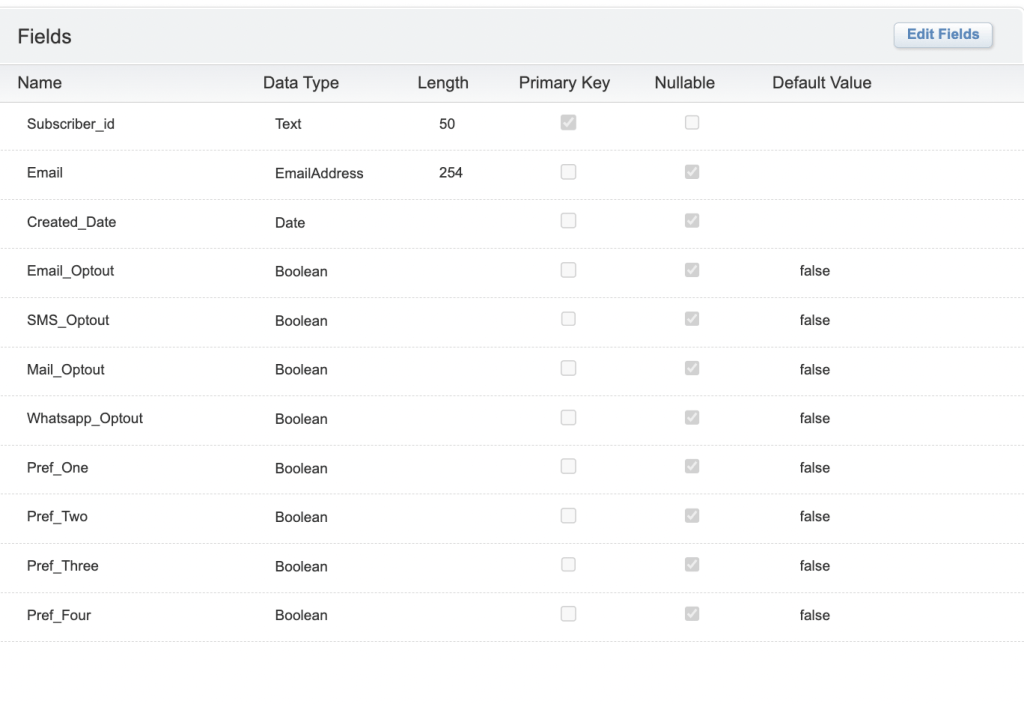
One data extension is created to store the preference updates made from the preference center. This can be used to update all subscribers lists for the consent values as well the salesforce objects.
This DE will contain the fields for all the preferences, consents, and subscriber ID.
In our case, we have the DE named “Preferences”. The fields and details for the DE are as below:
Stage 2: Develop Preference Center Form
This form will be built using the Cloud Pages > Landing Pages.
The page is built using the content blocks.
Step 1: Create a collection. Let’s call it the Consent Center
Step 2: Click on Add Content > Select Landing Page
Step 3: Name your Landing page and select the “Blank” template type
Step 4: Drag the HTML block. (This will be used in Stage 3 for adding the AMPScript Code)
Step 5: Drag the free-form block to the canvas
Step 6: Build your preference center with the required fields in the free-form block.
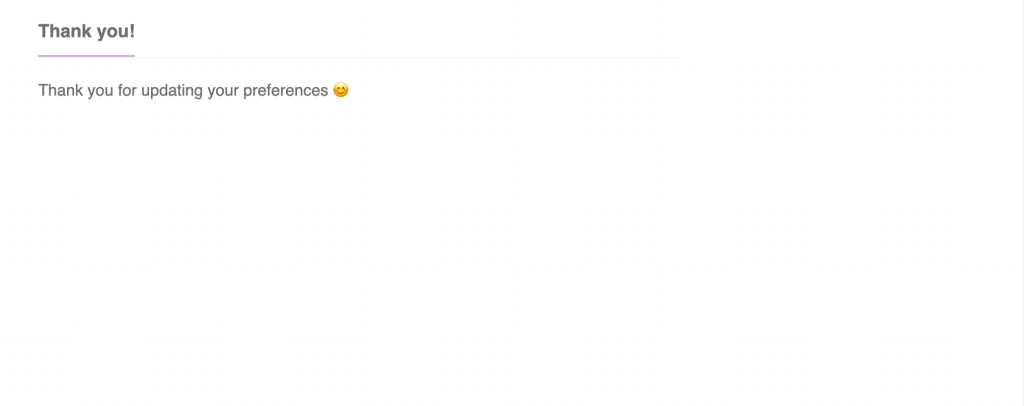
Step 7: Create another Landing Page as the “Thank You Page”.
This is where the subscribers will be redirected once the submission is complete on the preference center> All subscribers list as well as the salesforce object are updated simultaneously from the Thank You page.
Additional tip:
Free-form blocks can be used to input an HTML code for the form or individual free-form blocks can be used for each field. And the free form should be made so as to redirect the subscribers to the Thank You page.
Similarly, HTML code can be written for each preference field that is added in the free-form blocks.
The build decision depends on the end user. If an HTML developer is available in the team, their expertise can be utilized to build a form. If the team is made up of marketers and not developers, then the decision to go for free-form blocks would be more suited.
Stage 3: Add AMPScript
AMPScript is added to the Preference Center and the Thank you page to display information, retrieve information from the subscribers, and ultimately update the All-subscribers list and Salesforce objects.
This is added to the HTML block that was added in Step 4 of Stage 2
Ampscript Added to the Preference Center:
This is the part of the code that will lead to the display of currently available information of the subscriber on the page:
In our case, we are utilizing only checkbox fields, but the code can be modified to include different types of fields according to specific requirements.
The ampscript code below will be used in each free-form block used to create the preference fields on the page:
<div style=”display: block;”>
<div style=”font-size: 1rem;
display: inline-block;
margin-right: 50px;”>
<!–%%
[IF @Pref_One == “True” THEN]%%–><input checked=”checked” id=”Pref_One” name=”Pref_One” type=”checkbox” value=”True”> <!–%%[ELSE]%%–> <input id=”Pref_One” name=”Pref_One” type=”checkbox” value=”True”> <!–%%[ENDIF]%%–> <label for=”Pref_Education”>Preference One</label></div></div>
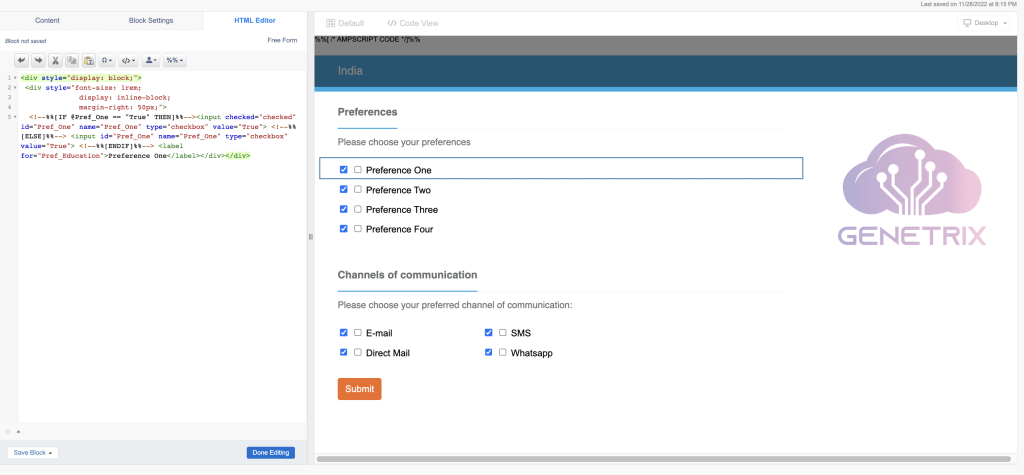
The checkboxes will be populated as per the data present in SFMC and Salescloud once the page is published.