Let’s Start With What is Agentforce?
Agentforce allows to build and manage autonomous AI agents, designed to execute specialized tasks to help businesses and customers. You can build a Sales Agent, Service Agent, Marketing Agent, Commerce Agent, and so on. In this article, we’ll be focusing on the basics of Agentforce and look at building a basic Marketing Agent.
Key Components
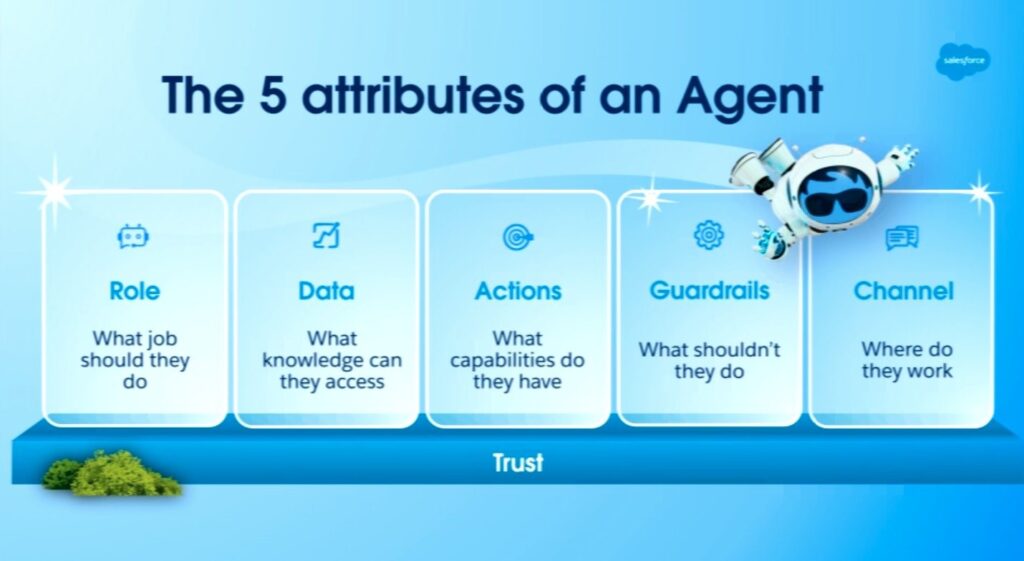
- Role: Defines the agent’s job or purpose and the broader goals the agent should achieve for your team.
- Data: The data an agent can access. This could include knowledge articles, files, CRM data, data via Data Cloud, public websites, and so on.
- Actions: The goals an agent can fulfill. This is the predefined task which an agent can execute to do its job based on a trigger. For example, it could run a flow, prompt template, Apex or call an API.
- Guardrails: Sets boundaries and restrictions on agent actions. These can be natural-language instructions telling the agent what it can and can’t do, when to escalate to a human, or could come from built-in security features in the Einstein Trust Layer.
- Channels: The applications where an agent gets work done. This can be your website, CRM, mobile app, Slack, and more.
Atlas is the “brain” behind Agentforce, which gives the agents reasoning ability to make them more autonomous and capable of handling complex tasks. Atlas operates through a structured process: it plans by understanding user queries, evaluates by analyzing context & available data, refines its approach, and retrieves relevant data.
When a reasoning engine analyzes a customer support query, it doesn’t just provide a single answer for the user’s query. It evaluates every retrieved text chunk, reranks for the most relevant chunks, then synthesizes the final response based only on those that are relevant to the user’s query. - Salesforce Engineering
Reasoning engines combine models, data, business logic, events, and workflows into unified cognitive architectures.
Phil Mui, Ph.D., SVP of Technology, Head of Products and Engineering for Salesforce AI Research
How Agentforce Works?
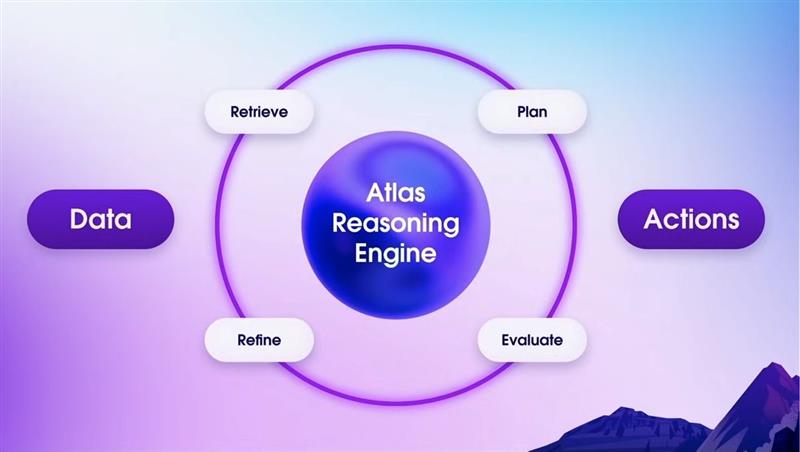
Steps:
- The agent first receives a trigger, which is a conversation from a customer. It sends the context to Large Language Model (LLM) and clarifies the Intent.
- The agent selects the correct topic and gets the Instructions to follow.
- The agent checks the pre-defined actions and executes them, while retrieving the relevant data from multiple sources
- The agent finally gathers the response and displays it to the customer.
Building a Marketing Agent
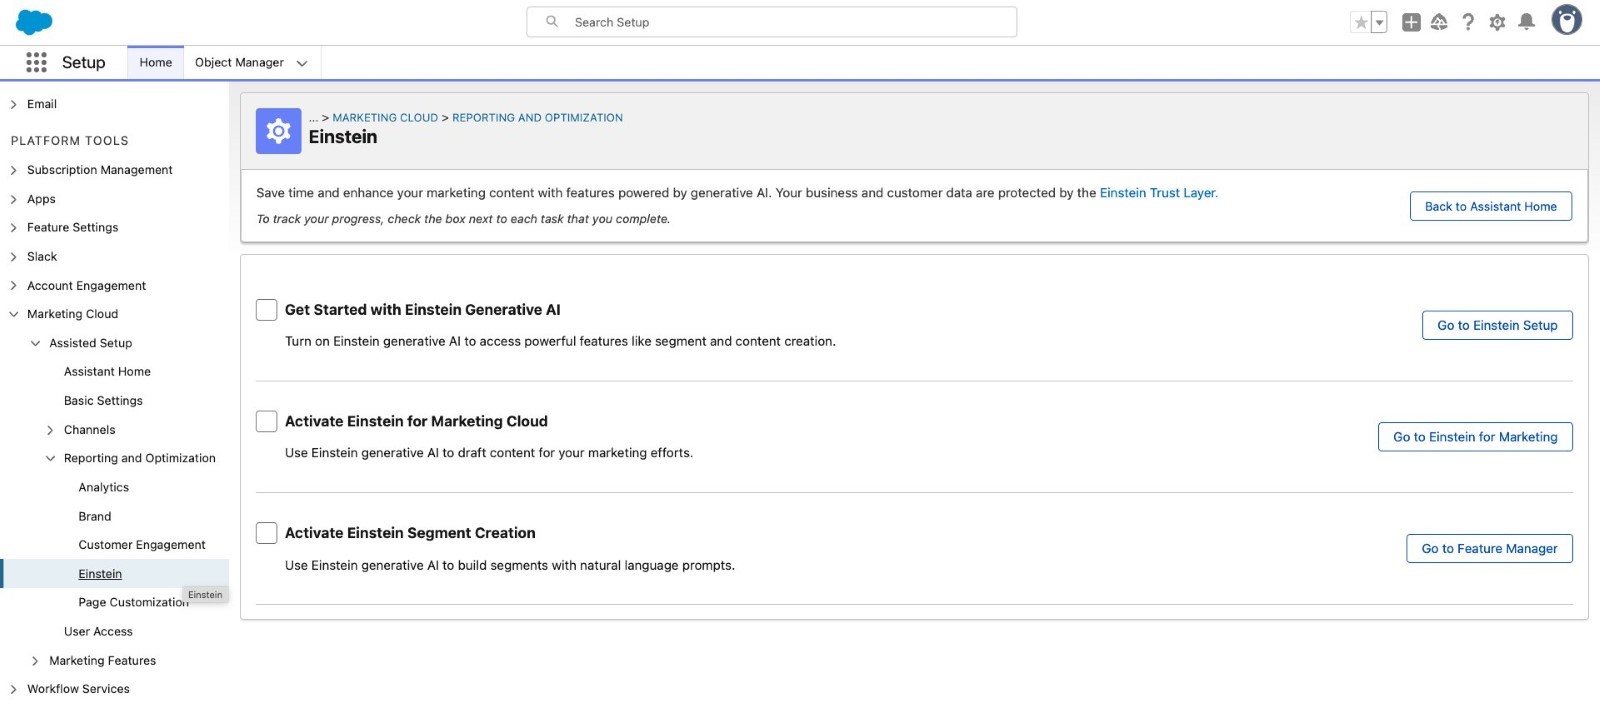
- First step is to enable Einstein Generative AI, Agentforce, and Segment Creation feature under Setup.
Go to Setup > Marketing Cloud > Assisted Setup > Reporting and Optimization > Einstein and activate them as displayed below.

b. Agentforce
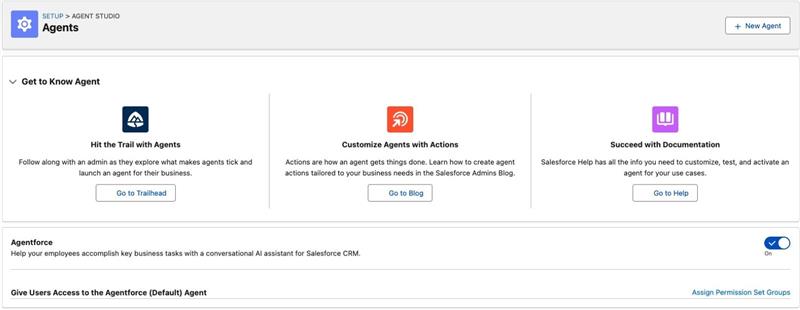
After enabling it, a default agent with name “Agentforce(Default)” will be created.
C. Segment Creation

- Next, go to Setup > Agents > Marketing agent
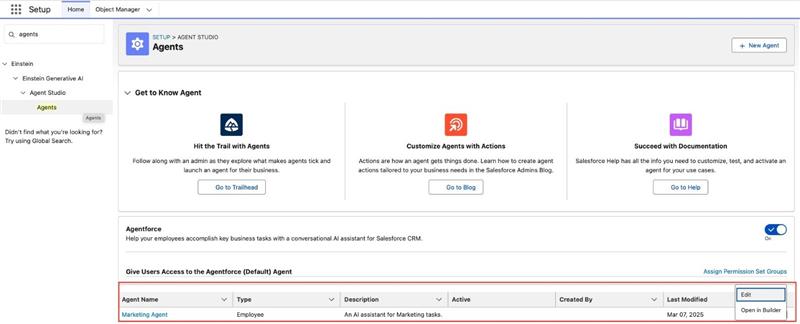
Note: When Agentforce is enabled, by default, Agentforce(Default) appears under “Agent Name”. I’ve modified the name & description in above screenshot for demo purpose.
For the Agent there are 2 options in the dropdown –
a. Edit: This is to modify the Agent details, which includes 3 tabs:
- Details: You can modify Name, Description, and enable Enrich event logs with conversation data (store conversation transcripts, including end-user data, in event logs for this agent. When this setting is disabled, conversation data is replaced with: Sensitive data not available).
To access event logs, open the “agent builder” and click on the last icon (highlighted in blue) in the left panel.
Without event log enabled –

With event log enabled –

- System Messages: Modify Welcome & Error Message for the Agent
- Language Settings: Define the language and style of your agent’s conversational responses. By default, language is English and Tone is Casual. This can be changed under “Agent Builder” at a later point.
b. Open in Builder: This is where we create the building blocks for an Agent.
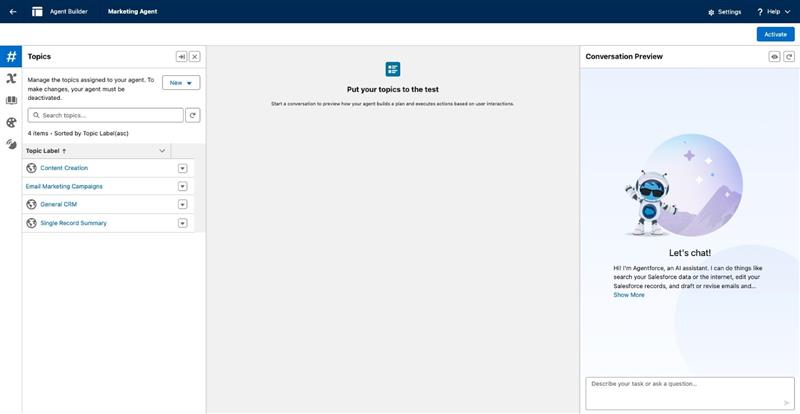
- Topics: Define the jobs to be done. Think of it like categories an agent can pick from based on the task to perform.
- Classification Description: Determine when to use your topic in a conversation, based on your user’s intent.
- Scope: Tell an agent what it’s able to do within your topic.
- Instructions: Help an agent make decisions about how to use the actions in a topic for different use cases. For example, ask an agent to collect clarifying information before running an action. Or tell an agent how to choose between different actions.
- Example User Input: help guide the agent with recommended actions for the topic. If this section is empty, the recommendation engine makes decisions based on conversation and other context.
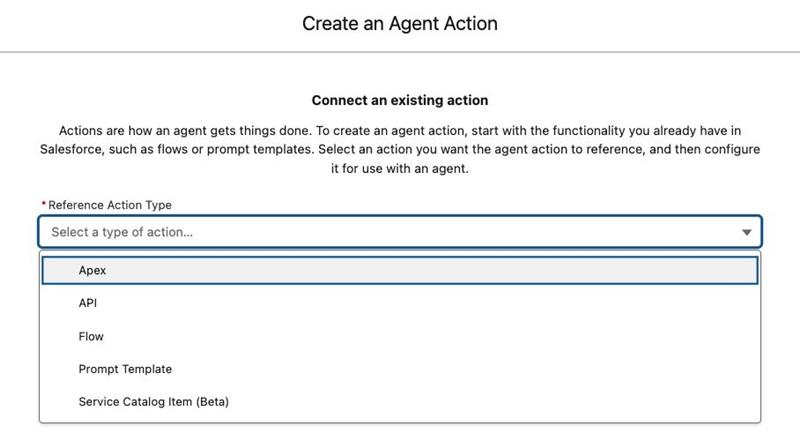
- Actions: Actions are tied to topics and are executed by the agent based on the task. The action types can be Flow, Apex, API, or Prompt Template. To setup a new action, start with creating a flow, then go to Setup > Einstein > Einstein Generative AI > Agent Studio > Agent actions, select “Action Type” as Flow and map the Flow.
You can also use pre-defined standard agent actions for a topic, which we’ll be using for the demo.
- Now let’s dive into how to setup an Agent to perform the following tasks –
- Summarize a Campaign
- Create a Brief
- Create a Campaign
- Draft an Email
- Revise an email under Campaigns tab.
- Revise an email from Salesforce Content Management System (CMS) Or Draft a new email
- Create an Audience Segment
- First, we’ll need to create three topics required to execute the above tasks.
For demo, let’s create 1 custom and 2 standard topics-
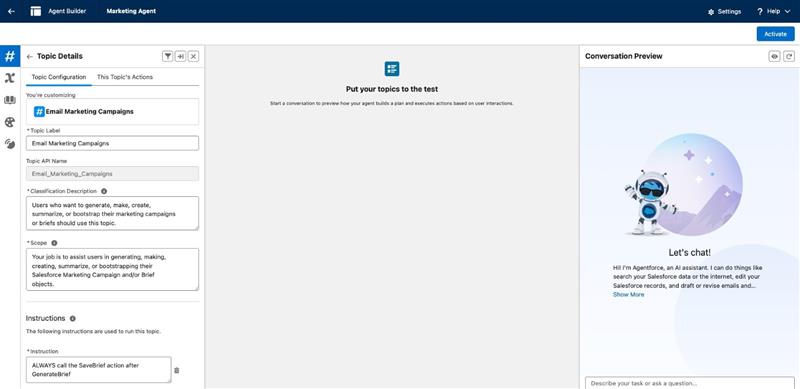
- Custom Topic: Under Topics create a new topic and copy-paste the following under Topic Configuration (refer screenshot below) –
- Topic Label: Email Marketing Campaigns
- Description: Users who want to generate, make, create, summarize, or bootstrap their marketing campaigns or briefs should use this topic.
- Scope: Your job is to assist users in generating, making, creating, summarize, or bootstrapping their Salesforce Marketing Campaign and/or Brief objects.
- Instructions:
- When a user asks to generate/make/create/summarize/bootstrap a Brief, Campaign Brief, or Marketing Brief, ALWAYS start by calling the GenerateBrief action.
- ALWAYS call the SaveBrief action after GenerateBrief
- When a user asks to generate/make/create/summarize/bootstrap a Campaign or Marketing Campaign without including a reference to a Brief (either in page context or history), ALWAYS start by calling the GenerateBrief action to first create and save a Brief that will be used in the CreateCampaignFromBrief action.
- When a user asks to generate/make/create/summarize/bootstrap a Campaign or Marketing Campaign and they reference a specific Brief (or a Brief record in page context or history), ALWAYS start by calling the CreateCampaignFromBrief action using the Brief that the user mentions.
- ALWAYS call the SaveCampaign action after CreateCampaignFromBrief
- When a user asks to summarize/review/recap/outline/sum up a Campaign, ALWAYS start by calling the IdentifyRecordByName action and return the recordID
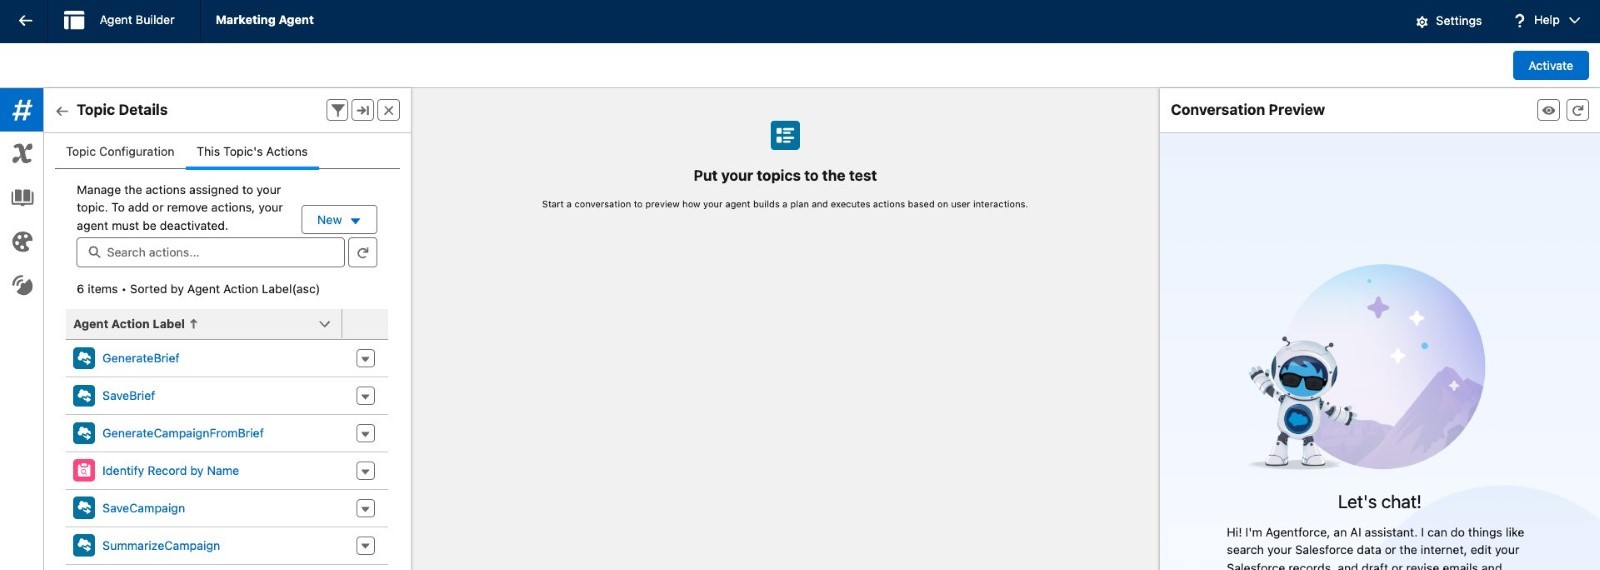
- Actions:
- GenerateBrief
- SaveBrief
- GenerateCampaignFromBrief
- Identify Record By Name
- SaveCampaign
- SummarizeCampaign
All the above actions are standard, so don’t have to create them separately.
- Standard Topic: Below two topics are standard which can be directly setup from under “Asset Library”
- Content Creation
- General CRM
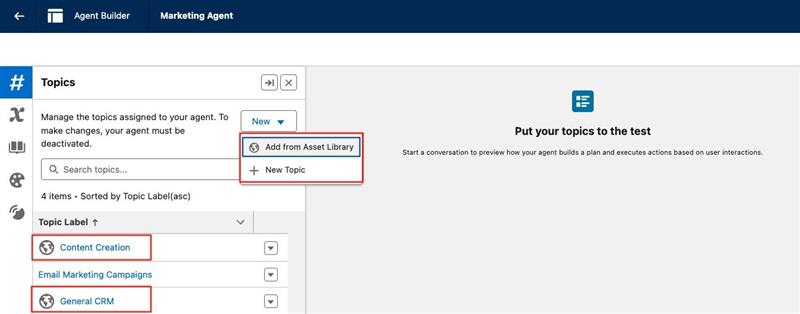
- Once all three topics are configured, test them under “Conversation Preview” and review the user prompt, actions triggered, and generated responses in the middle section – as and when you interact with the Agent.
Below are some examples to give a brief idea of how the Agent performs a given task. You can try using different prompts and test as well.
- Summarize a Campaign
- Prompt: Summarize the campaign “Genetrix test campaign1″
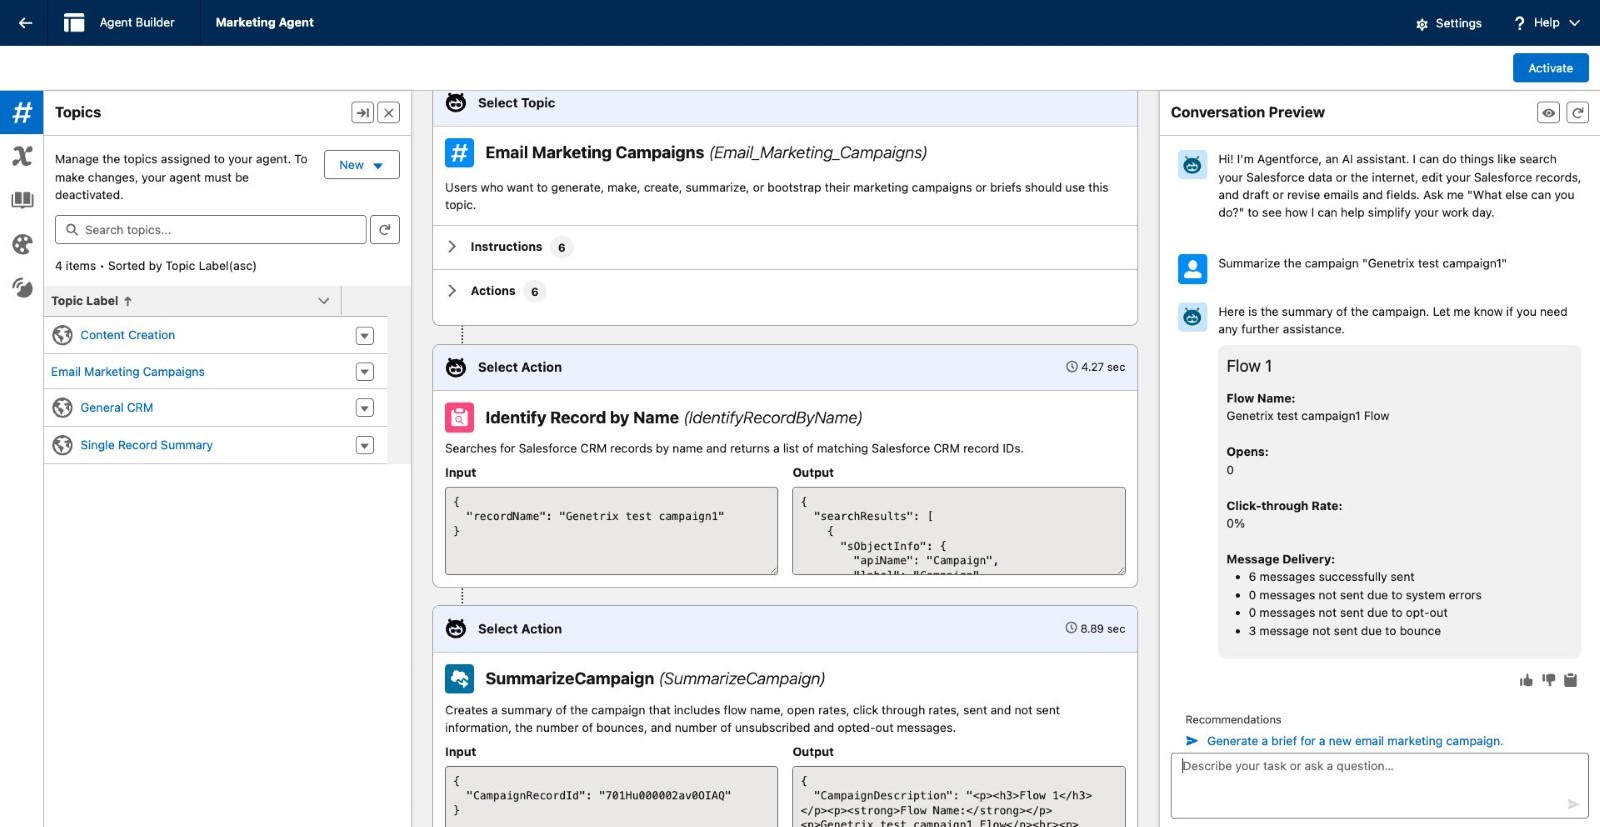
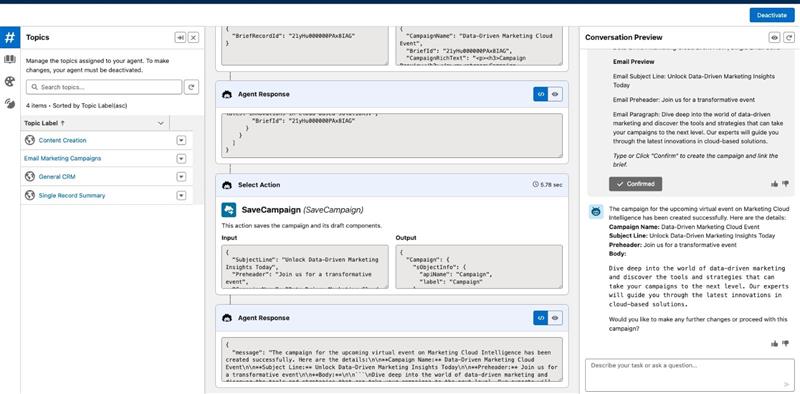
Create a Brief, Campaign and Email Draft: For creating a new campaign, first a brief is created and then the campaign along with an Email Draft and a Flow.
- Prompt: Create a new campaign for upcoming virtual event on Marketing Cloud Intelligence.
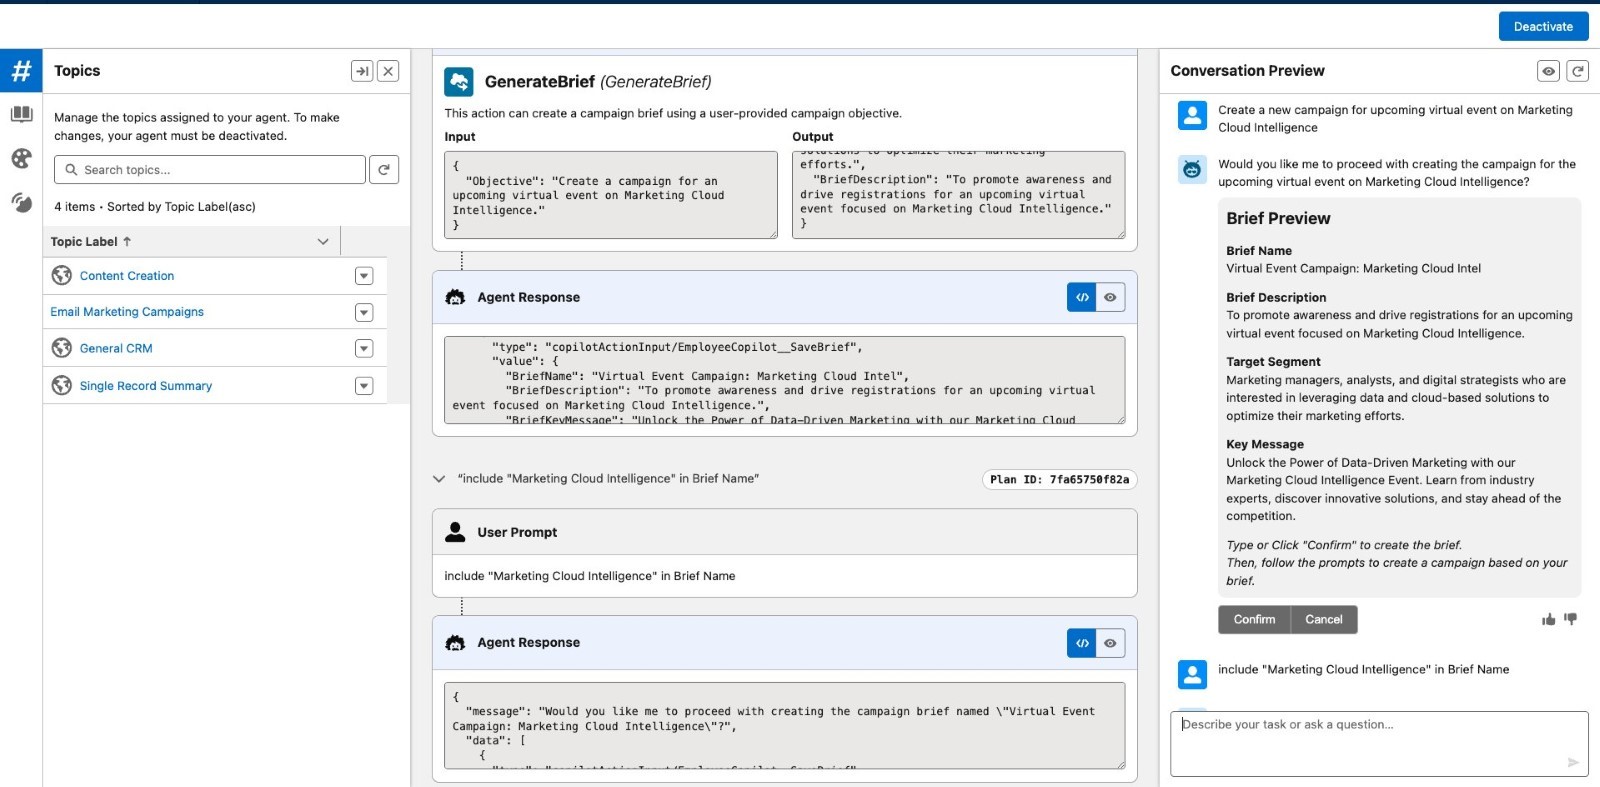
In the above screenshot, notice how it didn’t include the word “Intelligence” in the Brief Name. So, I added another prompt asking to do so. You can change the content for any section like “Key Message” as required. Once you’ve reviewed the details, save the brief, and proceed with creating a campaign.
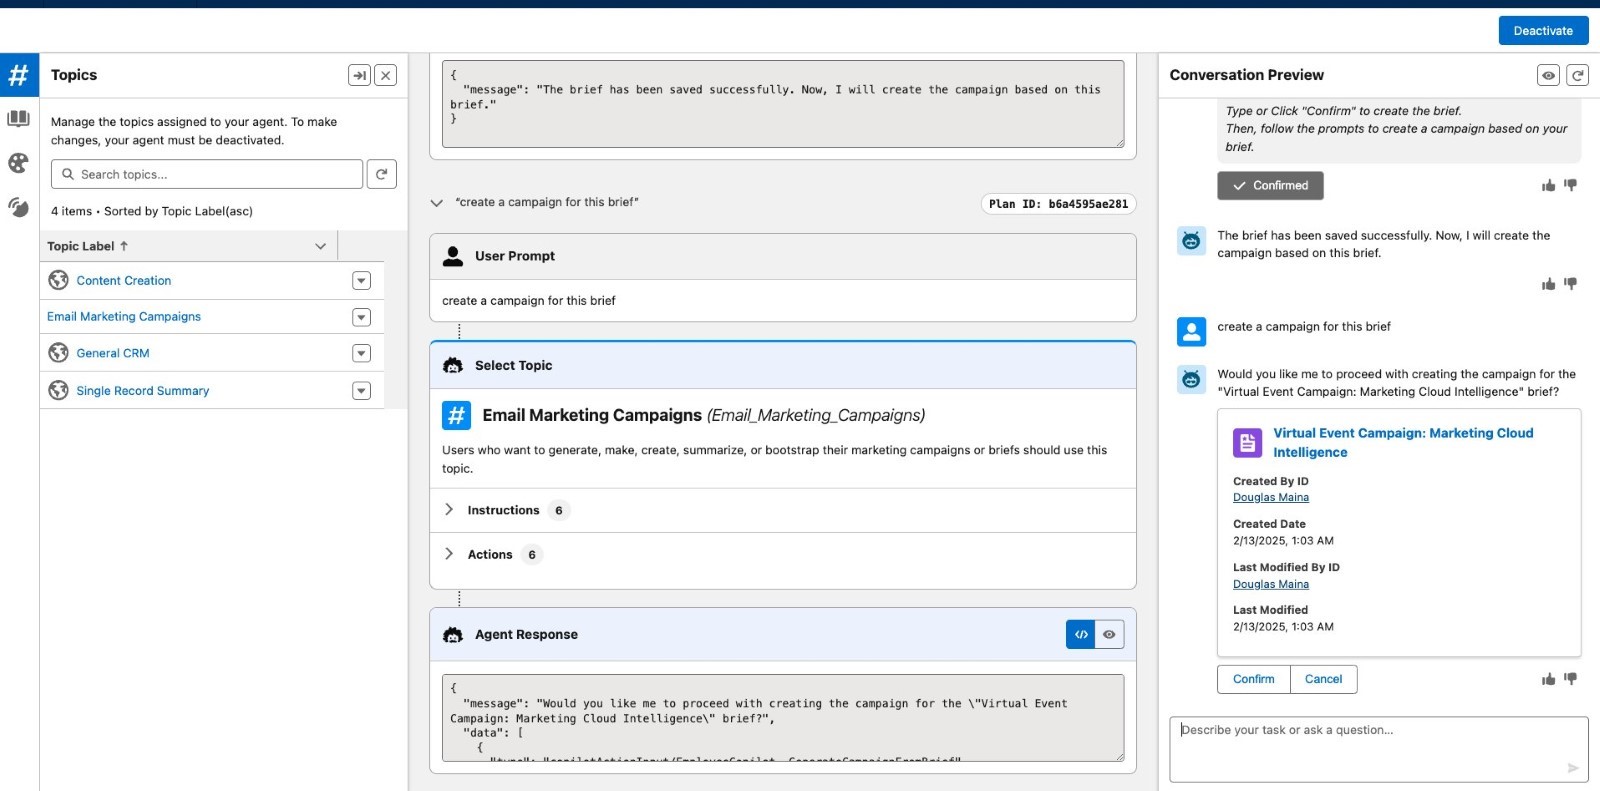
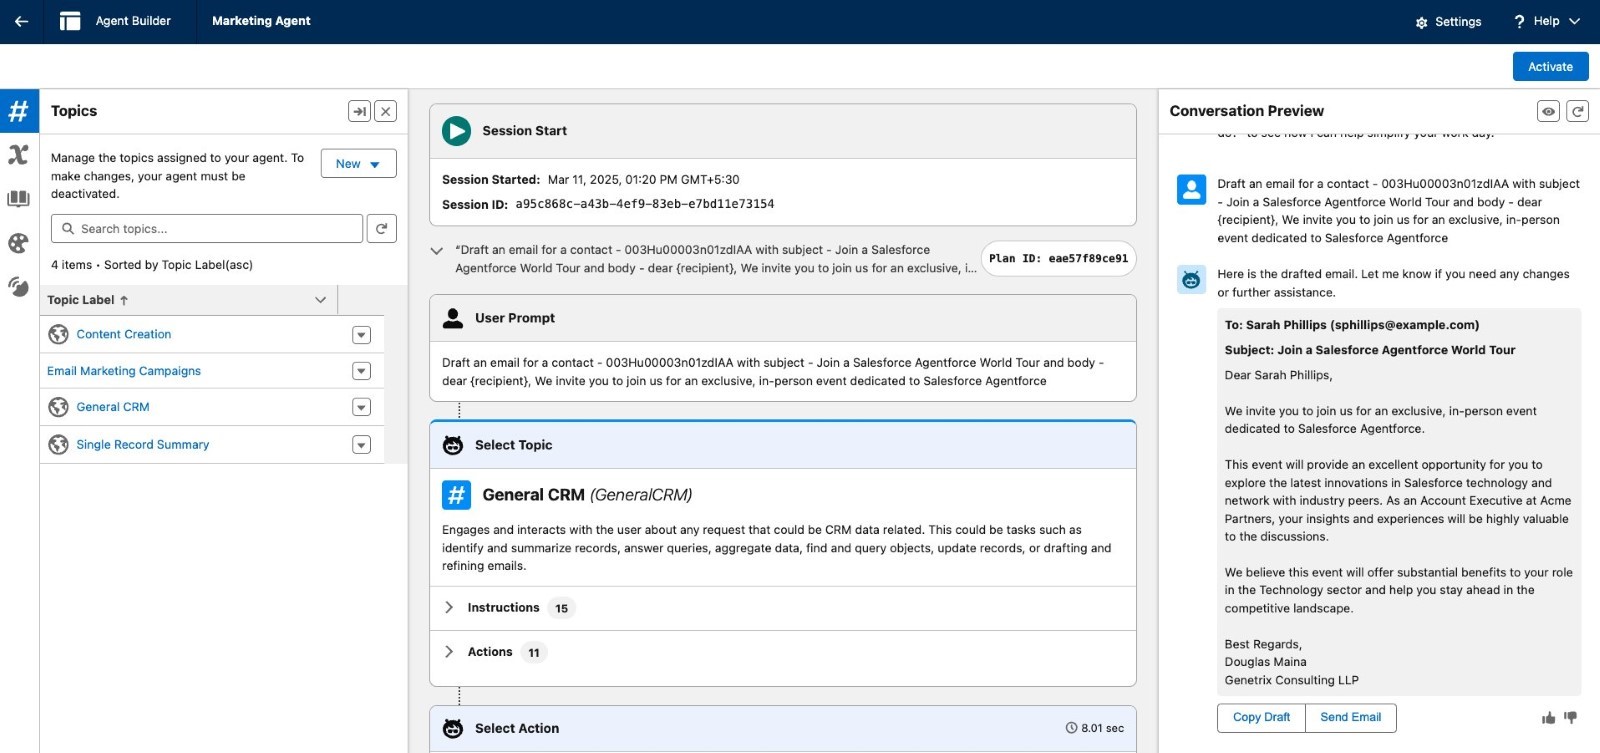
- Draft or revise an email for a contact using General CRM topic
- Prompt: Draft an email for a contact - 003Hu00003n01zdIAA with subject – Join a Salesforce Agentforce World Tour and body – dear {recipient}, We invite you to join us for an exclusive, in-person event dedicated to Salesforce Agentforce
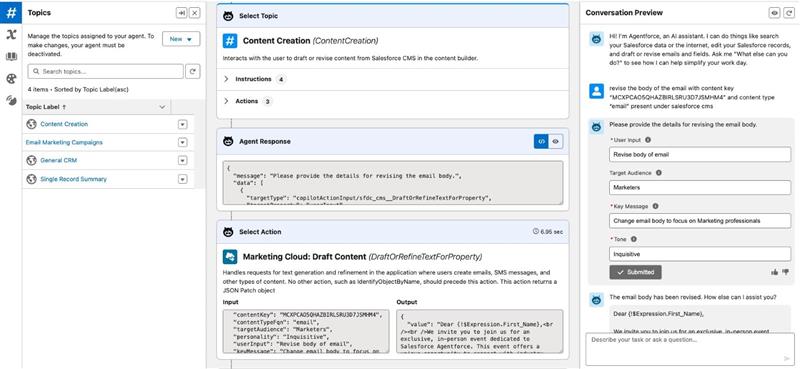
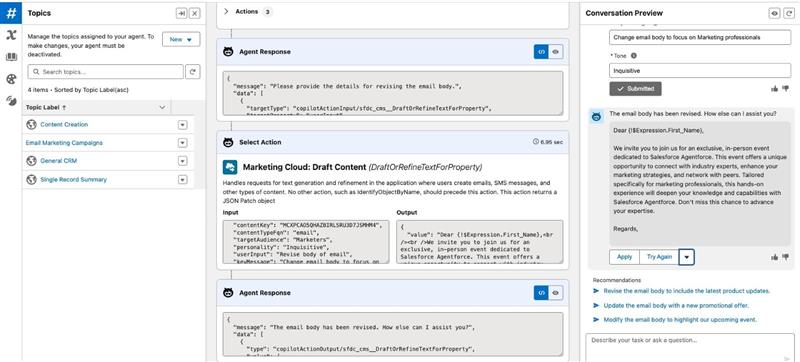
- Revise an email with Content Key and Content Type present under Salesforce CMS using Content Creation Topic
- Prompt: revise the body of the email with content key “MCXPCAO5QHAZBIRLSRU3D7JSMHM4” and content type “email” present under Salesforce CMS
- After you’ve tested the agent with various prompts and use cases, go ahead and activate the agent. Note that you cannot use the agent outside of “Agent Builder” unless it’s activated, else it throws an error “Something went wrong. Please refresh again”.
When the Agent is activated, you can draft a Campaign from the Home page by clicking on “Draft with AI” OR under Campaigns page by clicking on “Agentforce icon” in the top-right navigation bar.

- Go to Campaigns tab, open the email and draft using Agentforce
- Revise an email: Open the new campaign we created earlier or any other campaign, and modify the email subject line, pre-header or body using Content Creation topic. In the email, we just select the paragraph and click on sparkle icon (or the agent icon in top-left bar), it’ll revise the body with no prompt needed.
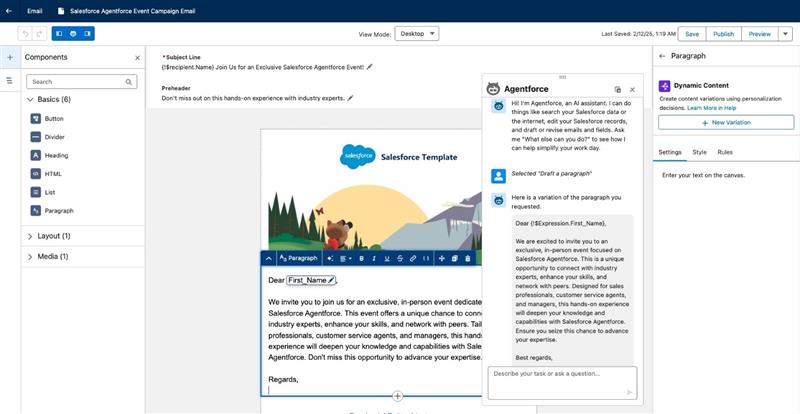
To use personalization, you need to create a “Data Graph”, which we’ll cover in another blog.
- Agentforce can also help with creating audience segments. Under Segments tab, create a new segment using “Create with Einstein Segment Creation“.
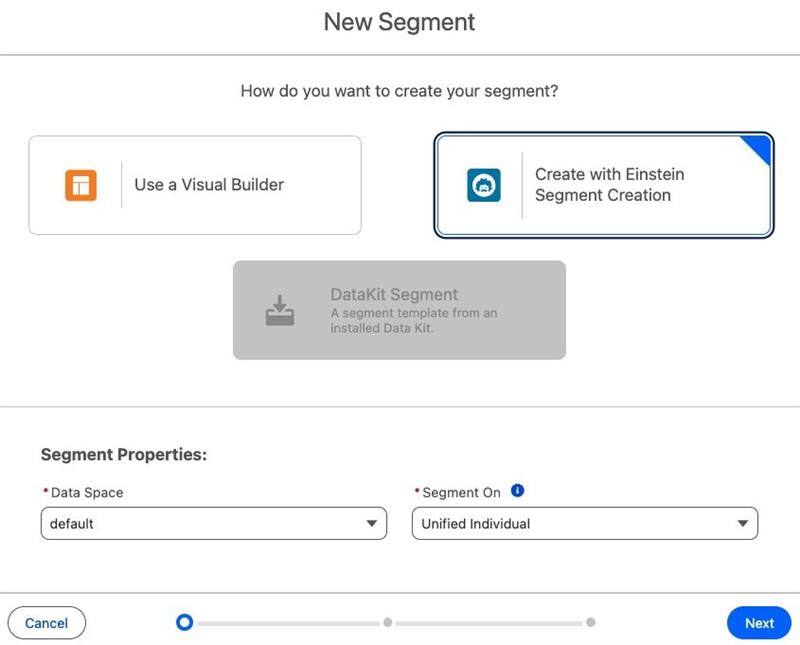
Prompt: Create a segment of “Create a targeted audience for the campaign “Salesforce Agentforce Event Campaign” who are working as Marketing professionals”
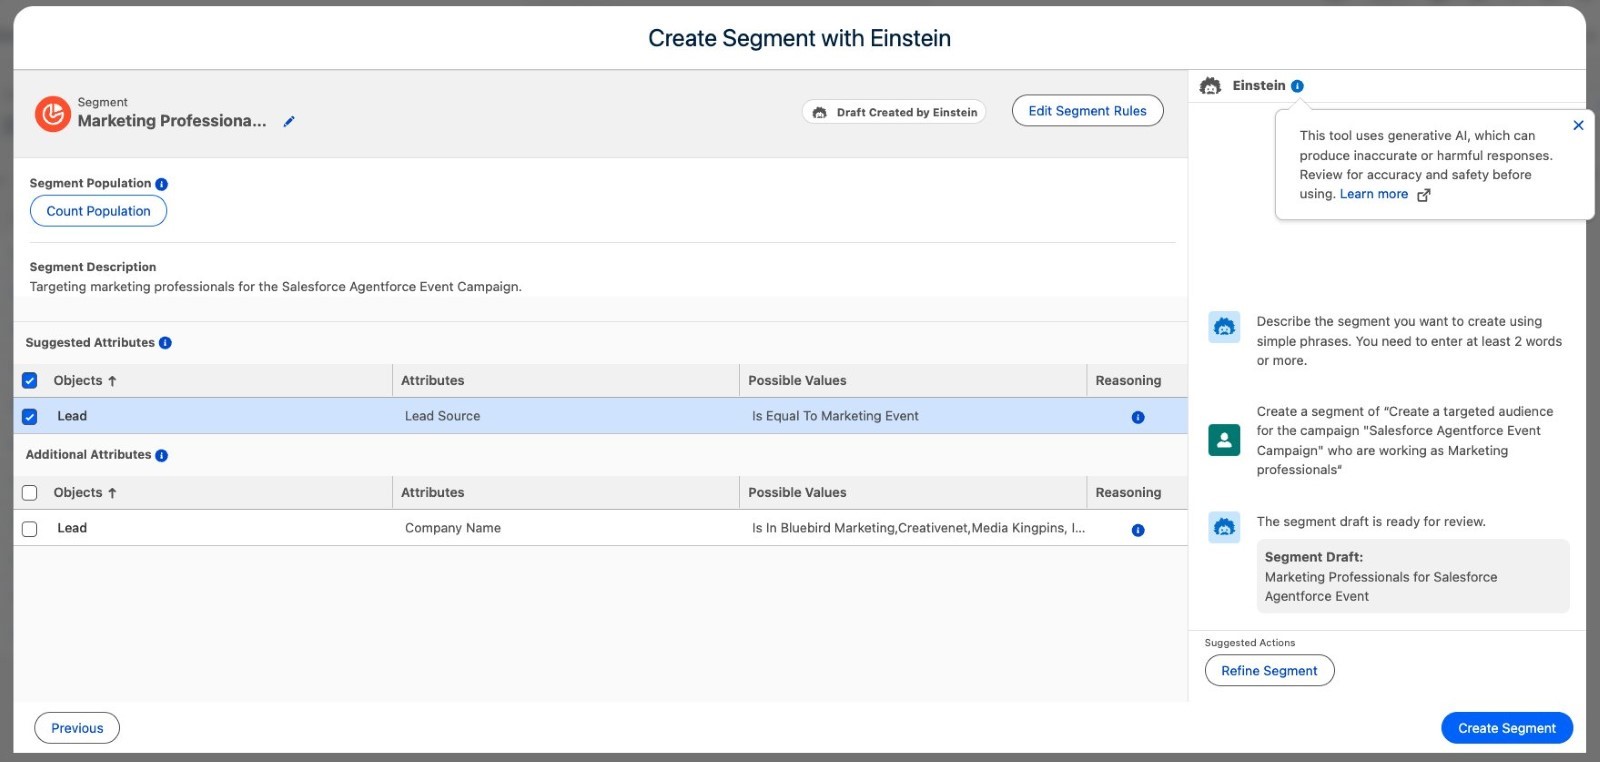
It retrieves the Salesforce Objects and Unified Profiles based on the prompt. You can further refine the segment as needed, select the required objects/attributes and check the segment count by clicking “Count Population”.
After the segment is created, select it under a specific campaign, and you’re ready to go!
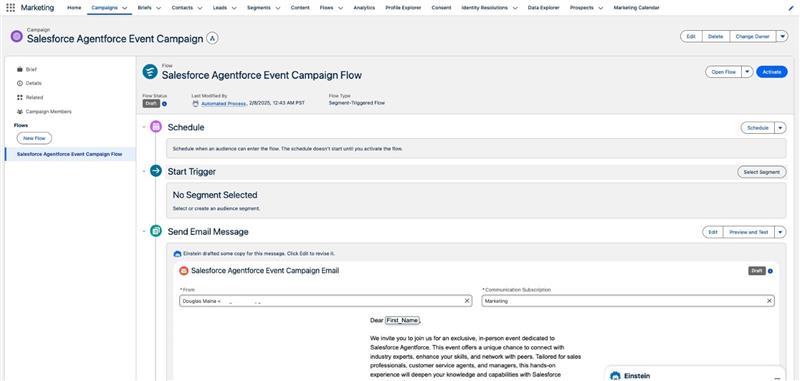
And that’s how we build a Marketing Agent!

Conclusion
Agentforce has a ton of other capabilities which can be extended by building custom agent actions via Prompt Template/Apex/APIs/Flows and used across various Marketing use cases such as – Automate personalized conversations on WhatsApp, Paid Media Optimization, and Automate Lead Capture.
***Some of the images and content used in this article are sourced from Salesforce Documentation.
