
The concept of conversion tracking enables measurement of the frequency of achievement of marketing objectives using specific metrics. Simple activities like purchasing something, downloading a white paper, or even seeing an important webpage can all be counted as conversions when evaluating the performance of campaigns
Track click-through data at a deeper level with Conversions Tracking, which allows you to track the customer traffic and revenues generated by multiple links within your emails. By inserting the necessary tracking code into your website, you are able to test, read, and optimize traffic rates and revenues for various campaigns.
You may configure your email to include a link to a landing page on your website using Conversions Tracking. The system sends you information about the subscriber and the email when they access that landing page using the email link, allowing you to monitor their activities on your website. After that, you can send the application information about the subscriber’s behaviour so that it can be presented alongside the regular email tracking information.
In email marketing, a typical conversion happens when a recipient of your email message responds to it by making a purchase, subscribing to a newsletter, or has done donation through a website or email.
Case study
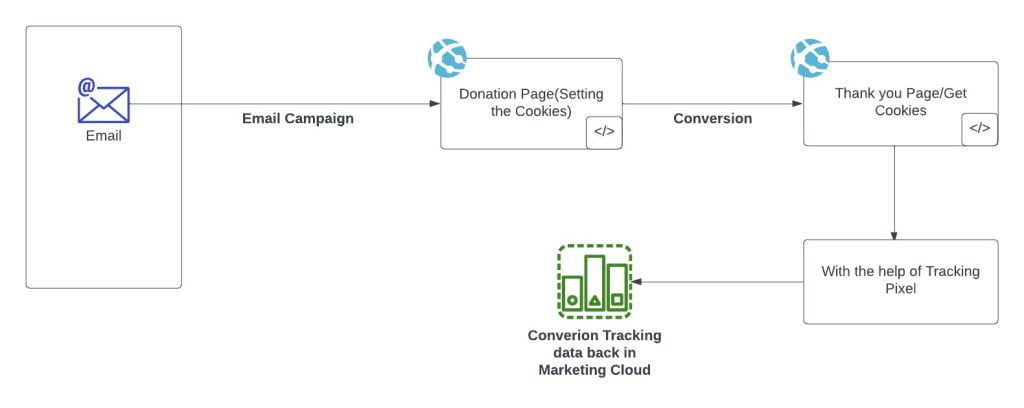
Let’s say we want to track how many donations have been made to a website or donation page. So, to keep track of the donation on a website or donation page through email, we must set cookies on the donation page to keep track of the subscriber’s behavior information. When a subscriber opens a donation page from an email and clicks a link then mandatory parameters (j,sfmc sub,l, u, mid and jb), which will append to the URL, will recognize information about the subscriber to the Marketing cloud application so when we enable the Conversion tracking checkbox in Marketing cloud, those required parameter gets appended to the URL. Once the subscriber donates the amount on the donation page, then the user will get redirected to the Thank you Page, and from there we can fetch the cookies from the Thank Page. After the subscriber reaches the page that signifies a conversion, such as the post-purchase thank you page, the data is sent back to Marketing Cloud. In the Marketing Cloud reports, viewing both the standard email tracking data and this conversion tracking data is now possible.
Steps Involved in Conversion Tracking
We need to add the Conversion = true parameter in the Anchor tag or else we can enable the ‘Conversion Tracking Link’ checkbox.
eg: <a href=”https://www.genetrix.tech” conversion=”true”> www.genetrix.tech </a>

By doing Conversion= true, when the subscriber clicks on the link, SFMC will add mandatory parameters with a given link which require for conversion tracking.
i.e: j, sfmc_sub, l, u, mid, jb
1) j = JobID
2) sfmc_sub = SubscriberID
3) l= ListID
4) u= LandingPageID
5) mid= Business Unit MID
6) jb= JobBatch
Implementation required in Webpage/ Conversion page:
You must include JavaScript/PHP/ASP code to all website pages in order for the landing page or website to accept the aforementioned uniquely identifiable parameters given by the marketing cloud. To retrieve the parameters, this code will set cookies on all conversion pages. On all pages that represent a conversion for you and have scripts to retrieve cookies and build tracking pixels with XML, add an additional piece of code. All of the tracking data required for Marketing Cloud to return the data to itself must be in this XML file. Once the subscriber purchases the product successfully. then the website should pass XML with respected parameters and values to SFMC.
https://click.s.exacttarget.com/conversion.aspx?xml=
XML Parameters: –
Checking the tracking data found in Email Studio’s Tracking folder is necessary to determine the campaign’s effectiveness.
Click the Grid Options button and then choose the Unique Conversions and Total Conversions option boxes to view conversion tracking statistics on the main tracking page. The fields cannot be changed because they are predetermined. Click on conversions in the top navigation bar to examine conversion data in detail. All of the data you want to view can be modified here.
Also, you can create numerous custom reports and schedule them in accordance with your needs.
Guidelines for using the Conversion Tracking Tab:
- Tracking >> Sends >> My Tracking >> Click on the email >> Conversions Tab ‘


To deep dive further into Conversion Tracking of Marketing Cloud.
Send us an email on [email protected] or book a demo.